
Creator's Corner: Gel Transfers
Posted by Flax on 8th Apr 2015
 How to make a Photo Transfer - what to use and how to do it
Michelle Williams, a Manager here at FLAX, is an avid scrapbooker who decided to try Gel Transfers for the first time. “I wanted to use some of my old photographs of the family in a creative way that wouldn’t harm the photos.”
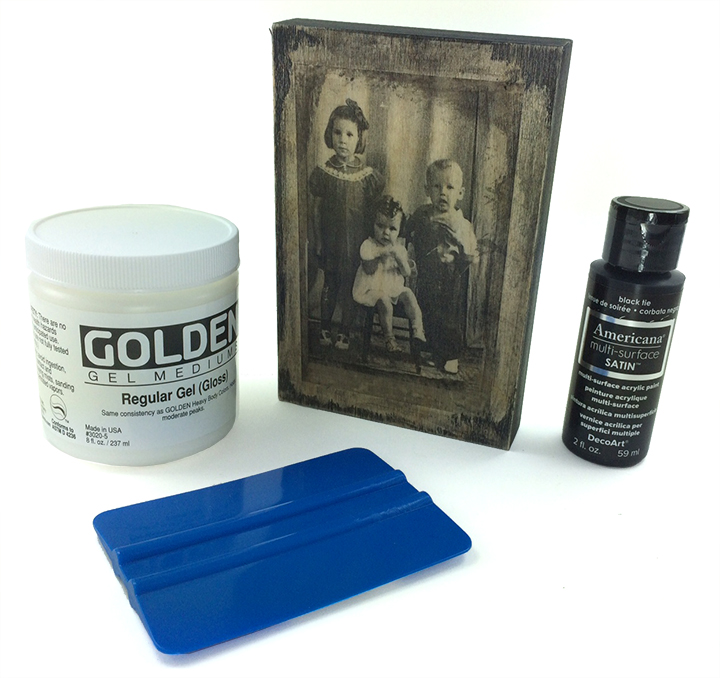
Michelle was able to use simple and safe materials to produce a unique, one-of-kind photo transfer that wows family and friends. The key is the Acrylic Gel Medium. Gel medium provides the adhesion and unique finsh to the project. Michelle used one of the versatile Birch Wood Panels but many porous surfaces can also be used such as paper and canvas. Michelle applied watered down Americana Acrylic Paint onto the transfer as a stain and created a striking, realistic aged look. Alternatively, you can use no paint and expose the surface below the transfer or apply washes of multiple acrylic colors for a vibrant outcome with a lot of interest.
Multiple images can even be transferred onto one surface for a seamless collage effect that involves no pesky transparencies or sticky glue that may not last. The possibilities are endless! Gel transfers are a great way to preserve and show off special photos or create captivating art that will impress and keep viewers guessing as to your deceptively simple process.
Here Michelle shares how she applies a gel photo transfer onto a wood panel, the steps she took, and the materials she used to make it a success.
- Start by printing your photo on a laserjet printer using regular copy paper. Only a laserjet print (toner based) will work, not an inkjet printer (liquid ink).
- Apply a nice even coat of Gel Medium with a sponge brush on the area of the wood panel where you want to transfer your image, then place the print face down onto the wood. Using a squeegee, gently smooth out any visible bubbles and let it dry overnight.
- Once dry, remove the paper by putting some water in a bowl and dip the wood panel into the water to wet the paper. Then, using your fingers, start rubbing the paper off. Be patient, as this will take some time. Let the piece dry and see if any of the paper lint still remains and repeat wetting the image and rubbing off the lint as needed.
- After all the paper residue is removed and dry, it’s time to stain the piece. Using a mixture of black acrylic paint diluted with water makes a quick and easy stain. Once the stain is prepared, dip a lint free rag into the stain and wipe it on quickly. Use a dry piece of rag to wipe off excess portions of stain.
As will often be the case, if you feel there are areas with too much stain, use your sandpaper to sand it down to the desired look.
- To finish the piece and protect the artwork, simply apply the Gel Medium as a top coat.
Materials Used:
- Birch Wood Panel
- Plastic Squeegee
- Sandpaper
- Black Acrylic Paint
- Acrylic Gel Medium Gloss
- Lint free rag
- Sponge Brush
- Laser Printed Photo
- Water